
Sunday, March 24, 2024


Friday, March 15, 2024
Crafting a Turning Saw (Bow Saw)
Fabricating the Frame

A turning saw, often likened to a miniature bow saw, shares similarities with a coping saw but boasts a larger frame typically around 12 inches in size. Tools for Working Wood offers a turning saw of exceptional quality for approximately $180, slightly beyond my intended budget. However, they generously furnish both the components and comprehensive blueprints for constructing one's own saw, a project well-suited for most woodworking enthusiasts. Accompanying the parts and plans is a detailed set of construction notes, facilitating the process significantly.
To commence the project, I procured a set of pins and three blades from TFWW, intending to fashion my own handles owing to the presence of a lathe in my workshop. The plans, when printed on legal-size paper with scaling disabled, yield accurately dimensioned templates. These templates, including those for the cheeks and stretcher, necessitate adherence to straight-grained stock due to the substantial stress these components endure. Once the templates are affixed to the chosen stock using an Elmer's glue stick, they serve as guides for cutting. Any residual adhesive can be easily eliminated with a wipe of mineral spirits, especially since sanding the wood is a subsequent step in the finishing process.
Minor deviations in the cutouts, as encountered in my own work, need not cause undue concern given the forgiving nature of the design. While alignment of the pinholes is desirable, the overall precision required is minimal, given the primary function of the saw—to provide blade tension and support during cutting operations. Any discrepancies can be remedied through carving or sanding adjustments during subsequent stages of assembly.
In the next phase,
these roughed-out components will be transformed into finished parts, including
the creation of knobs and a winding toggle.
- Free Plans: https://toolsforworkingwood.com/extra/images/bowsaw/Gramercy_bows_full_8x14.pdf
- Notes: https://toolsforworkingwood.com/store/more/bowsawplans.html
- Parts: https://toolsforworkingwood.com/store/item/GT-BOWS.XX
Assembling the Turning Saw: Completing the Construction
Following the shaping of the frame components, attention turned to the fabrication of the handles and the winding toggle, depicted in the accompanying image. Regrettably, photographing the process while utilizing power tools, including the lathe, proved cumbersome, necessitating a descriptive narrative in lieu of visual documentation.
The toggle begins as a ½” diameter cylinder, easily fashioned from offcuts derived from the saw material. After rounding the ends and forming a cove near one extremity to accommodate the tensioning strings and allow for pivoting under tension, the toggle is completed by flattening the opposite end into a paddle shape. Multiple methods exist for achieving this, but I opted for expediency, utilizing a stationary belt sander for a swift process lasting a mere 60 seconds.
Similarly, the handles, fashioned from walnut for their durability, were swiftly fashioned on the lathe. A ¼” hole bored into one end accommodates the blade pin, while the handle's simplistic form lends itself to a straightforward turning exercise, with precision being of secondary importance. After the completion of both handles, the blade pins are securely affixed in place using a slow-setting epoxy, ensuring a robust bond. Any excess epoxy is carefully managed, as the pins are pressed into position, exploiting the grooved design to facilitate adhesion.

For the finishing
touch, a diluted boiled linseed oil is applied in two coats, providing both
protection and aesthetic enhancement. With the components prepared, final
assembly entails inserting the stretcher into the mortises and affixing the
blade to the pins, akin to a coping saw. Following the recommended stringing
method—utilizing 20lb (or stronger) braided fishing line—the toggle is employed to tension
the blade, with personal discretion guiding the extent of tension applied. The string/line is also available on the parts link above, but I had a fishing rod that used the braided line.
Acknowledging the subjective nature of tension requirements, experimentation and familiarity with the saw's nuances are recommended. As I acquaint myself with its operation, I intend to refine my understanding of optimal tension levels and share insights gained from practical experience. In conclusion, embarking on this endeavor proves to be both enjoyable and rewarding, offering a cost-effective solution to one's sawing needs.
Tuesday, March 12, 2024
Timber Intolerable?
 |
|
Manning, S. F.- New England masts and the King's Broad Arrow Greenwich, London: Trustees of the National Maritime Museum. (1979) Agents Marking Trees with the King’s Broad Arrow |
Although this is not very much discussed when studying the "Intolerable Acts" leading up to the American Revolution, one cannot but wonder why this is so overlooked. The biggest and most powerful navy in the world certainly needs ship masts.
England awoke to a timber crisis after commercial competition with the Dutch came to a breaking point. The Navigation Acts of 1651 had greatly limited imports into England, prompting Denmark to prey upon British ships as they sailed to and from the Baltic Sea transporting their timber cargo. It was at this time, on the eve of the first Anglo-Dutch War (1652–1654) that the Admiralty considered a plan to develop a North American source of timber and masts, and forgo possible crisis as a result of impending lengthy repair of battle-shattered masts.
North European fir had been the Admiralty's timber of choice for its mast construction. However, finding its supply chain obstructed, the Admiralty's second choice was the North American white pine. A shipload had been received from Jamestown in 1609 and another in 1634 from Penobscot Bay, both of which were found to be agreeable .[35] There is disagreement amongst scholars about which variety was the strongest, however the North American white pine was considered more resilient, one fourth lighter in weight, and exponentially larger; reaching a height of 250 feet, several feet in diameter at the base, and weighing in as much as 15 to 20 tons. Accordingly, the Admiralty sent a fleet of mast ships in 1652 and thus began Britain's steady importation New England masts .
Following the development of New England's shipbuilding industry, it became common for the British to retail New England ships due to significantly lower production costs. The abundance of naval stores and good timber enabled colonists to produce ships thirty percent cheaper than the English, making it the most profitable manufactured export during the colonial period.
The Admiralty's venture to get mast logs out of the New England forest, in turn, produced a labor force that with it developed into a booming domestic lumber industry. Since ninety-plus percent of New England pines harvested were unsuitable for masts, an important building and commodities lumber market emerged converting rejected masts into merchantable boards, joists and other structural lumber. Such was the success of the colonial entrepreneurs that the Crown became concerned that its newfound resource of dependable naval stores and masts would quickly dwindle.
In response, King William III enacted a new charter in October 1691 governing the Massachusetts Bay Colony, reserving for the King “all Trees of the Diameter of Twenty Four Inches and upwards” that were not previously granted to private persons. The portion of the charter quickly became known as the King's Broad Arrow. All timber consigned under the charter were marked with three strikes of an ax resembling an upside down arrow. The importance of the policy only increased with the onset of The Great Northern War (1700–1721), which all but halted Baltic exports to England. Consequently, British Parliament began passing a series of acts regulating imports from the Baltic and promoting imports from New England.
The Act of 1704 encouraged the import of naval stores form New England, offering £4 per ton of tar or pitch, £3 per ton of resin of turpentine, and £1 per ton of masts and bowsprits (40 cubic feet). The Act of 1705 forbade the cutting of unfenced or small pitch pine and tar trees with a diameter less than twelve inches. The Act of 1711 gave the Survey General of the King's Forests authority over all colonies from New Jersey to Maine. Lastly, the Act of 1721 extended dominion of the King's Forests to any trees not found within a township or its boundaries, and officially recognized the American word ‘lumber’ for the first time.
However, the acts and policy proved virtually impossible to enforce. A survey in 1700 documented more than fifteen thousand logs that violated the twenty-four-inch restriction.[40] Attempts to curb illegal lumbering continued under the appointment of John Bridger as survey general in 1705. His task was to survey and protect His Majesty's Woods, duties of which he performed with great enthusiasm. Bridger conducted extensive mast surveys, confiscated illegal timber, and prosecuted violators, to no avail. Colonists didn't care, and often disregarded the Broad Arrow mark. It became virtually impossible for a single surveyor with a few deputies to police the entire expanse of New England's forests. After much pleading on behalf of Bridger for more resources and authority, the Parliamentary Acts (1704–1729) slowly eased the burden of his charge. Ironically, in 1718 Bridger was removed for corruption and his predecessor, Colonel David Dunbar, treated the post with indifference.
The effects of the policy on the American economy remains unclear. Without the Admiralty's quest for choice timber, the American lumber industry may not have developed as quickly. Certainly, the policy ensured a steady, reliable source of mast timber during England's ascension to naval dominance, but at a price. Perceived violations of property rights on New England colonists served only to stoke the embers of rebellion. Shipments of New England timber continued unabated until the outbreak of the Revolutionary War. The last supply of New England masts reached the home country on July 31, 1775, after more than 4500 white pines had been sent under the Broad Arrow policy.
The American industrial revolution caused the national demand for timber to spike. Prior to the Civil War, more than ninety percent of the nation's energy came from wood, fueling the great transportation vehicles of the era. As Americans settled the timber-starved Great Plains, they needed material from the lumber-rich parts of the nation with which to build their cities. The burgeoning railroad industry accounted for a fourth of the national lumber demand and required the product to build rail cars and stations, fashion ties, and power trains. Even as the coal began to replace wood as an energy source, the coal mining industry itself needed lumber to support its mining structures and create its own rail beds. Technological development helped the industry meet the soaring demand. New methods of transporting lumber, like the steam engine, provided the means to log further inland and away from water. New machines such as the circular saw and the band saw allowed forests to be felled with significantly improved efficiency. The resulting increased timber production saw New England forests become rapidly depleted, and American loggers began methodically cutting their way south and west in search of new forests.
https://en.wikipedia.org/wiki/History_of_the_lumber_industry_in_the_United_States#
Sunday, March 3, 2024
National Historic Marker Day - 26 April
Historic markers all across the nation provide a glimpse into the past and preserve history for future generations. On the last Friday in April each year, National Historic Marker Day invites volunteers and communities to come together to maintain their markers. Unfortunately, weather and time take their toll on these small monuments to history. By working together, we not only ensure these markers tell the stories to future generations, but we also take the opportunity to celebrate the history and culture they preserve.
NationalHistoricMarkerDay
Historic markers pop up all over the country. In fact, according to the Historical Marker Database, more than 157,000 historic markers preserve history across the United States. Look closely, and you will see them near significant natural formations, state and national trails, historic buildings and communities, and even cemeteries. They tell stories of cultural, national, and historical significance. They also remind us of the people who lived, worked, contributed, played, created, and survived in communities all across the country.
Many historic markers are neglected and in need of upkeep. National Historic Marker Day invites individuals and communities to come together to restore and preserve these glimpses into our culture and history.
HOW TO OBSERVE NATIONAL HISTORIC MARKER DAY
- Register your local or regional National Historic Marker Day event on the William G. Pomeroy Foundation website: wgpfoundation.org
- Volunteer to clean and preserve historic markers in your community.
- Share your event with others to showcase your progress and community spirit.
- Lead a fun educational activity to encourage student engagement with history.
- Join the conversation by using #NationalHistoricMarkerDay on social media.
- Follow the Pomeroy Foundation on Facebook, Twitter and Instagram to see photos from volunteers across the country.
NATIONAL HISTORIC MARKER DAY HISTORY
The William G. Pomeroy Foundation established National Historic Marker Day in 2021 to highlight the value historic markers bring to the entire country and encourage volunteers to help preserve them. More than three dozen volunteers across multiple states participated in the inaugural event. Volunteers were encouraged to take photos of their cleaning efforts and post them on social media. As the celebration's creator and official host, the Pomeroy Foundation curated a photo gallery and shared it on social media.

In 2022, the Registrar at National Day Calendar proclaimed National Historic Marker Day to be observed annually on the last day in April.
Thursday, February 22, 2024

Wednesday, February 21, 2024
Building a Wooden Canteen for your Uniform Kit

During the Revolutionary War the canteens carried by British soldiers were made of tin, lightweight and watertight. These tin containers weren’t a type of canteen—they WERE canteens. In other words, at the beginning of the war canteens were by definition made of tin.
The Americans, however, were forced to improvise. Having no source of tin, tin canteens were not an option. Iron was available but was too heavy. So, the “canteens” carried by most Patriot soldiers were wooden containers (usually made of cedar and oak) that before the war had been called “wooden bottles.” By 1777 these “wooden bottles” were standard issue in the Continental army and state militias and had come to be also called “canteens.”

The photo is of the wooden canteen of Connecticut militiaman Asa Plank, a veteran of the Battle of Saratoga.
The following Reasearch was conducted and presented to Popular Woodworker magazine in 2022, who published a two part article.
- https://www.popularwoodworking.com/projects/building-a-wooden-canteen-for-your-uniform-kit-part-1
- https://www.popularwoodworking.com/projects/building-a-wooden-canteen-for-your-uniform-kit-part-2/
It is also available for download in PDF at: https://www.instructables.com/Wooden-Staved-Canteen/
 Figure 1- Wooden Canteen - Jas. Townsends which is popular among reenactors |
Google has some nice pictures but a set of plans or instruction for building a canteen is not to be found, in the direct sense anyway. My internet searching identified a drawing of a “Lewis and Clark (L&C)” canteen (Figure #3). The diagram provides the rough dimensions and accoutrements of a barrel shaped wooden canteen. I will continue to call it the “L&C diagram” but have seen other places where it’s referred to as the uniform and kit of the 42nd Highland Regiment, an Australian Napoleonic reenactment society (among others). The actual author or artist is not known, but the drawings are very informative.
The basic and most popular barrel in demand was an airtight, fifty two gallon (200 liter) barrel made of thirty-one to thirty-three staves with a lid at each end. The preferred wood was oak, for its density, strength, and qualities it released in the aging of spirits. Certain types of barrels were also made with pine, especially yellow pine. The lids or ends were often made of white oak. The staves were held together by wooden hoops (especially the smaller pails and buckets) made of hickory.
Staved or segmented construction figures in a lot of projects, from ornamental bowl turnings, to musical drums, porch pillars and whiskey barrels. Coopering is an art for in itself, barrel making or cooper is a skilled trade that dates back over 4,000 years. Herodotus (b. 485 BC) described palm wooden casks in shipping Armenian wine to Babylon. Around 350 BC, Celts were using watertight barrels that bulged at the middle to withstand stress and could be rolled as well as stacked. The wooden canteen can only be surmised to be a manufacturing technique similar to its big barrel brother.
Coppers were skilled technicians, fashioning barrels from raw wood through many processes. They were in great demand in Colonial America. I can imagine that smaller containers such as canteens and buckets could have been an apprentice skill builder or the smaller cut-off pieces from barrel making were used in smaller containers.
Now back to building our reproduction wooden canteen.
Staves and Segments
As discussed, a wooden 18th century canteen is more or less a shortened wood barrel with the sides made from staves. Less the coopering tools and techniques, we will pursue a suitable reproduction that you can build in your home workshop. The questions we now ask ourselves is;
· What miter angle (or bevel) do I need for the side staves?
· How long (or wide) should I make the stave pieces?
|
 Figure 2- 1874 Model of US Army Canteen, From History of the Military Canteen (Nov- 1900) |
Finding those answers is relatively easy, and there is an interesting how to article in wood magazine, that demonstrates the mathematical formulas for calculating the angles/miters. Since we know we are making a canteen for our Uniform Kit, I have provided the measurements for a large and small version of the reproduction canteen.
First, let's get our terminology straight. Staved cylinders (what we are trying for) and segmented rings may seem alike to woodworkers, but they're two different approaches in making rounded structured wood objects. In general, the grain in rings constructed from segments runs horizontally and the individual pieces are glued end to end. On the other hand, the grain in staves runs vertically, and glue the individual pieces edge to edge. In our case, “Bevel-to-bevel”. For our canteen project, we will be using staves where the grain runs over the long direction of the stave/piece.
So, things can become confusing when we start talking about the distance between the angles. On a stave that distance is the width, but on a segment, it's the length. For our canteen project, we'll refer always to length. As shown in the L&C diagram [Figure #3} we know the canteen stave is 4 inches long. So, for bigger canteen is to make a wider stave, in other words make a larger diameter ring. I made my first prototype of a larger canteen as later shown in diagrams and tables. However, for your “Uniform Kit” I would recommend the smaller version.

Figure 3 - The L&C Diagram of Canteen Construction
So, what is the Angle for the Staves?
|
Corner and Miter Angles for various numbers of sides |
||
|
No of Sides |
Corner |
Miter |
|
6 |
60 |
30 |
|
8 |
45 |
22 1/2 |
|
10 |
36 |
18 |
|
12 |
30 |
15 |
|
16 |
22 1/2 |
11 1/4 |
A full circle contains 360 degrees. So, to make our canteen from a number of straight pieces, all of the angles of the corners should add up to 360 degrees. In the table (Figure #3) six equal-length sides, the six 60-degree corners add up to 360 degrees.
But, 60 degrees is not the angle you need to cut on the ends of each piece. Because two sides come together to make the angle, each side must be miter-cut to exactly half the total corner angle, or 30 degrees. So, half of 60 is 30.
Here's the rule for finding the angle: To determine the corner angle for a figure with any number of equal-length sides, divide 360 degrees by the number of sides. To find the miter angle, divide the corner angle by two.
To achieve a round canteen with minimal cutting, the more staves in the circle the more round the appearance, and less finishing will be needed, to get a round canteen. A canteen with 6 or 8 sides could be made, but the round hoop work for coopering (a real canteen) would not work effectively. 10 seems like a good number, but I have been doing 12 staves, as it appears more rounded. 16 is a bit awkward for the smaller canteens since the pieces would be so narrow. So, now we have an understanding of the dimensions of the staves we will work with 12 sides/staves. The examples for the large and small canteens are both designed with 12 staves
So, how big will it be?
I found an article in Wood Magazine[1] about working with staves and segments. The article details the mathematics of calculating of how big it will be? Great, if you are designing a porch post or even a canteen. But I have done all of that for you. No math calculating needed. My prototype canteen was about 8.5 inches in diameter. It turned out pretty big, and by mathematics, it holds about ¾ of a gallon. Enough for a long march, but I think every day use a smaller 1 quart would probably suffice for SAR uniform kit. With this in mind I am providing a table for the dimensions for both the larger 3.25-quart sized canteen and the smaller 1.8-quart canteen in the following tables.

Figure 4 - Completed Small and Larger Wooden Canteens
Canteen Dimensions and Cylinder Staves

|
|||||||||||||||||||||||||||||||||||||||||||||||||
|
|
||||||||||||||||||||||||||||||||||||||||||||||||
Not much changed between the two examples provided. We know the stave is 4 inches long, on the outside width of the stave changes. Without having to write about mathematics, the diagrams and information tables were generated using the online tool listed in Reference 2.
Volume of Example Canteens
The cylinder is a three-dimensional shape having a circular base. A cylinder can be seen as a set of circular disks that are stacked on one another. Now, think of a scenario where we need to calculate the amount of water that can be accommodated in a cylindrical box or a stave barrel canteen.
In other words, we mean to calculate the capacity or volume of this box. The capacity of a cylindrical box is basically equal to the volume of the cylinder involved. Thus, the volume of a three-dimensional shape is equal to the amount of space occupied by that shape. Not wanting to do an algebra class you can adjust your numbers to calculate the cylinder volume using a calculator from at: https://www.omnicalculator.com/math/cylinder-volume
After the canteen is completely assembled it is estimated that the volume will be as follows.
Estimated After Assembly Inside Dimensions
|
|
Small Canteen |
Large Canteen |
|
Height |
3.50 |
3.50 |
|
Radius |
3.10 |
4.15 |
|
Inside Diameter after Build |
6.20 |
8.30 |
|
Estimated Volume |
1.83 Quarts |
3.25 Quarts |


Tools Needed |
Materials |
|
· Table Saw · Router w/ ¼ rabbiting bit · Band Saw or Jig Saw · Sander or sanding block · Power Drill · Drill Bits · Step drill bit or small rasp · General hand tools |
· ½ thick lumber – 48 inches long (4 inches x 12 pieces) · ¼ inch thick plywood – 10 inches x 20 inches · 1 each, 2-inch-wide cotton/linen carrying strap · 1 each, 2 Inch strap buckle (optional f/ carrying strap) - · 2 each, 3-1/2 inches long x ½ inch wide leather pieces or steel strap · ½ leather banding or steel strap (for the hoops) - · Tacks for strap · 120 Grit Sand Paper for rouging and shaping · 220 Grit Sand Paper for finishing · Quality wood glue · Double sided tape · Paraffin Wax or Bees Wax · Wood Stain · Linseed Oil for final finish · Tapered Cork · 2 Inch Brass Buckle (optional) |
Building Your Canteen
Cutting Your Staves
Ripping the Primary Miters
Cut your staves from a ½ inch thick piece of square lumber. If the piece is long enough you may only have to do this once and create all the staves from one piece of lumber. Our you may substitute shorter pieces and repeated the cut. Set your table saw blade to cut at a 15-degree angle, rip down one side, creating you first bevel. Adjust the table saw fence to the “Stave Outside Width” of the stave you selected (3.25 quart or 1.8 quart). Flip the board where the bevel is facing down and is against the fence of the table saw. Rip the second bevel in the long piece of lumber. Now you should have a long piece with a 15-degree bevel on each long side in sort of a “V”. The ends of the lumber are still at 90 degrees.
We will now cut the individual (12) staves. The stave wood grain goes along the length of the stave.
Warning - Do Not Crosscut with The Rip Fence – Instead, use a miter gauge or a crosscut sled.
You have to make your staves with crosscuts into several pieces of identical length. DO NOT use the rip fence as a supporting barrier for crosscutting. You can clamp a stop block to the fence for accurate measurement of length and use the miter gauge to guide your stock through the blade. This way, you eliminate the risk of your workpiece getting squeezed between the fence and the blade.
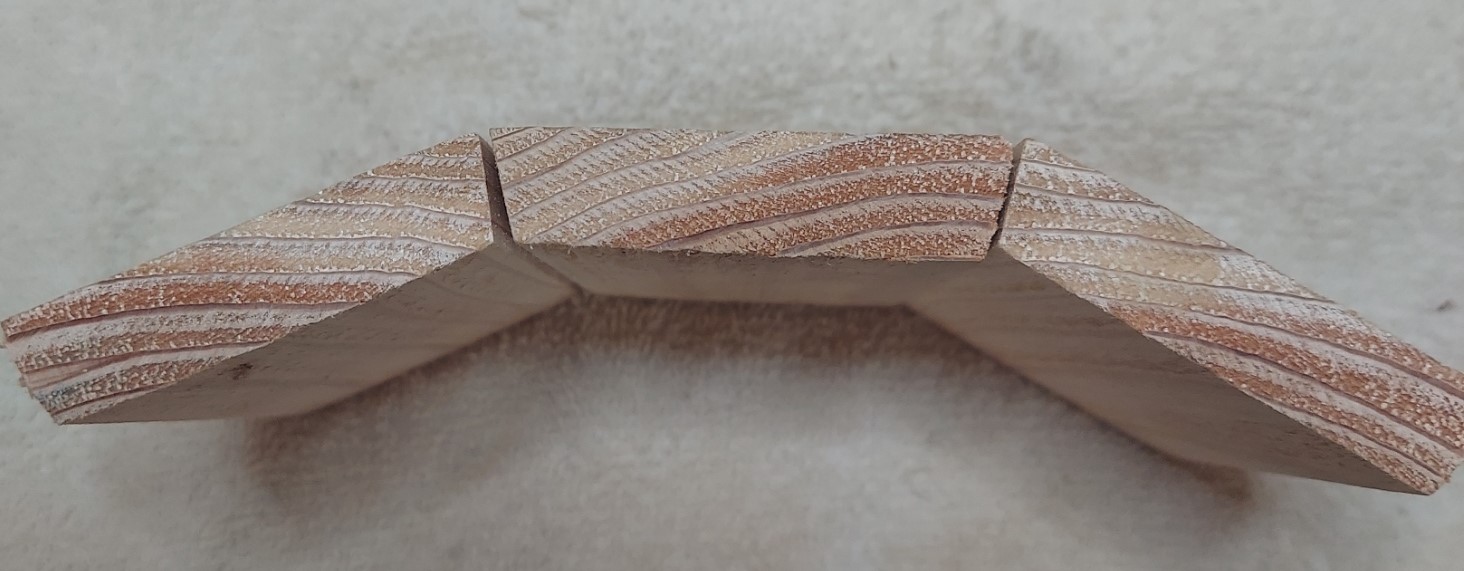  Figure 5-
Stave segments cut at 15 degrees
|
Set your table saw fence block to be 4 inches from the blade, and use the miter gauge on the table saw to hold the lumber perpendicular to the blade. Cut a small piece from the end of the lumber piece to balance the cut, and rid it of any roughness or splits. Check for squareness of this end cut. Then make the 12 staves with a crosscut.
Cutting the Top and Bottom Stave Channels
  Figure 6- Stave channels being fitted to the Top and Bottom Panels |
1. You can make several passes of the stave on the table saw to cut the channels. Set where you want the cut on the table saw, bet the blade height to ¼ inch, cut a pass on each piece on each end. Make successive cuts until you get a channel (rabit) ¼ inch wide and a ¼ inch deep.
2. Use a Table saw with a da-do blade, ¼ inch stack set to ¼ in height. If you have this, you probably know how to use it as well.
3. Use a router – assuming you have one you probably know how to use it for this project and I won’t detail it here.
Cutting the Top and Bottom Panels`
The top/bottom panels have to be built but if you can rely on the schematic image the panel may not fit, as this is the overall diameter, not allowing for the channels to hold the top/bottom in place. It is best to dry assemble your canteen with blue painters’ tape, and measure the inside channel across the to the opposing channel to ensure a tight fit.
Everyone has their way of cutting a circle using various templates, jigs, compass drawings and so forth. Use a band saw or jig saw to cut the circle as accurately as you can. Take two pieces of ¼ inch Plywood about 9 x 9 inches square. Use some double-sided tape to adhere the two pieces together. This allows you to cut both top/bottom panels at once. Sand the edges smooth and sand the surfaces before assembly and finishing.
Test the fit of the round panels with the dry fit you did earlier with blue painter’s tape.

Building a Spout and Stopper
The Spout
|
  Figure 7 - Step Drill Bits and Tapered Rasp for Rotary Drill |
|
  Figure 8- Spout w/ Stopper |
The Stopper
|
  Figure 8 - Cork Stopper with Walnut Wood Handle |
Assembling the Canteen
NOTE: If you plan to carry water in your canteen, that is its purpose, you may want to do some waterproofing. Afterall, this is a reproduction, not a “barrel-pressed” hoop staved container. If waterproofing is wanted, see the section below.
Use a board to align you staves against. Roll out blue painters’ tape, and place the outside of the stave onto the blue tape. When all the staves are in place, apply glue to the stave mitered joints and to the channels. Place the top and bottom panels near the center of the row of staves. You can then roll the painters tape stave “chain” up and around the top/bottom panels. Secure with tape, bands or straps until the glue is completely set.
Shaping the Mitered Outside Corners
After assembling the canteen and all the glue is dried completely, you can begin shaping the 12 sides into a rounder appearance. If you have a belt sander or even a powered sander this can be done very quickly on soft woods such as pine. If you do not have powered gear, a wood block and fresh sandpaper will also work. You probably will do finer details with a sanding block as well. Do not forget to sand the end grain of the staves smooth. Begin with the 120-grit sand paper and progress to 220-grit, and finer grits if desired. Judge by eye and touch for roundness, and sand down the bumps and ridges that are noticed.
Waterproofing your Creation
I have found three similar methods for waterproofing the inside of the canteen. Brewer’s Pitch, Bees Wax, and Paraffin. All three are applied in similar fashion by melting and pouring inside the canteen. You will have an easier time applying the hot pitch, wax or paraffin to the inside for waterproofing after the canteen is assembled and sanded to the round cylindrical shape. It is my theory, that any polyurethan, epoxy, paint or other coating may not bond entirely, or peel off the wood when in long/continuous contact with a liquid. Bees wax could also be used instead but it imparts a bit of flavor to the contents. If you are drinking mead, this may be desirable. For my canteen, I used melted paraffin as it is tasteless and the least expensive. Keep in mind that alcohol beverages can also damage some wood finishes.
Fortunately, I have an old Crock-Pot, that I have used on other projects needing melted wax. If you don’t have a Crock-Pot, use a double boiler to melt the wax evenly. Both paraffin and bees wax have low melting points and are also flammable and the double boiler technique will mitigate the risk of a flare up, and melt the wax evenly. A double boiler can be a normal household cooking pot with boiling water, and a scrap tin/metal can to hold the wax. Use a funnel in the canteen spout of the canteen to pour the melted wax inside. When applied or poured, the wax will remain liquid a bit, but don’t wait too long. You are only wanting a coating on the sides. Insert the stopper, and roll the canteen about to evenly coat the insides, and pour out the remaining melted wax, back into the metal can. It doesn’t take long, as the wax will begin to solidify as soon as it touches the surfaces inside. I recommend finishing the outside completely before coating the inside, so if you happen to spill a bit of paraffin on the outside, your stain/finish will still adhere properly. In my resource notes near the end of this paper, I have listed two manufacturers who use different methods to waterproof their versions of a staved barrel canteen.
Sanitation and Hygiene as Applied to Canteens
The use of polluted water is a factor dangerous to health and accounts for the prevalence of disease in localities where other sanitary conditions are beyond reproach. It is the part of wisdom to remove the danger of possible contamination by the use of a canteen which can be completely emptied, drained and even sterilized.
There can may be enough places for germs and micro-organisms to make the use of the canteen. Recommend sanitary conditions be observed to sterilize your canteen in a way as not to damage the wood or melt the inner paraffin coating with excessive heat.
Do not store the canteen with water inside. Empty and air dry when not in use.
Applying the Outside Wood Finish
There are a wide variety of ways to finish the outside of your canteen. Depending upon how well the plywood top/bottom pieces match the wood staves, this could be a design enhancement or detractor. If you use soft pine wood for the staves, the color variation of the staves compared to the top/bottom panels could detract from your design. Linseed Oil is used on tool handles such as axes, adze, shovels ect. For a reason. It allows inspection of the wood for splitting, where such defects my not be detectable under a coat of paint. Linseed Oil is inexpensive and makes a long-lasting finish. It imparts a soft yellow hue to the wood, and can be applied with a folded cloth. If you want a darker color to help in color matching the wood, you should stain the wood first, prior to applying the Linseed Oil or your chosen final finish.
Attaching Hoop and Strap Guides Ornamentation
|
|
Period canteens were also “hooped” with wood bark strips and leather reinforcement. Or, you may find a suitable banding material that could be attached to your canteen, that could be painted to appear as metal or perhaps covered with a metalized tape. For my canteen I used half-inch leather straps and neatly spaced upholstery tacks. You have to see what is available to you and what works for your Uniform Kit.
The strap guides could be of metal as shown in Figure #1, or leather affixed to each side. The L&C diagrams, Figure #3, shows the blacksmith/forged guide piece as fitted under the hoops and bent to be held in place. I am sure there are many variations. For our purposes, upholstery tacks can be used to attach the guides to the canteen. Just make sure the tack will not split the wood or pierce the canteen staves creating a leak.
Attaching Carrying Strap
|
 Figure 10 - Methods of Carrying a Military Canteen - from The History of the Military Canteen |
I also found a 2-inch-wide brass slide buckle at Hobby Lobby that is affixed to the strap as an adjuster. My wife helped sew on the buckle and stitched the ends from fraying. The strap is placed under the round bottom edge of the canteen, with the strap threaded through the guides on each side. If using a strap without a buckle or adjuster, you can secure the ends of the strap under the guides (left or right) with short tacks.

Summary
Most of you probably are familiar with woodworking and only needed the diagram tables for making your own canteen for your Uniform Kit. This may also provide you guidance and ideas for dressing up or building you Canteen Kit, if you want to buy one. IF you are making only one canteen, the prices for the materials may exceed the price of a “canteen kit” from one of the reenactment suppliers. Nevertheless, I have enjoyed my research, and learned a bit. But I enjoy working on crafts in wood and plan to provide other period items in the future.
 |
|
The finished canteens….ta-da!
References
Wood Magazine; Wood Magazine Staff October 19, 2016, https://www.woodmagazine.com/woodworking-tips/techniques/intermediate/staves-and-segments
A Stave Drum, https://uniontownlabs.org/tools/stave/
History of the Military Canteen, Lieut. -Col. Phillip Reade, Inspector General U. S. V., (Major 4th U. S. Infantry) Published by authority of The Honorable, The Secretary of War, 1900. https://archive.org/details/historyofmilitar01read
Coopers Had the Colonists Over a Barrel: 18th Century Barrel & Cask Production in America, January 21, 2019, Historical Background, Life & Times, Harry Schenawolf, https://www.revolutionarywarjournal.com/coopers-had-the-colonists-over-a-barrel-18th-century-barrel-cask-production-in-america/
Fine Woodworking Magazine, Formula for tapered staves (Buckets/planters etc), https://www.finewoodworking.com/forum/formula-for-tapered-staves
- Fine Woodworking Magazine, The Craft of Coopering, Staves and a hoop make a watertight vessel, By Jonathan Binzen #248–July/Aug 2015 Issue, https://www.finewoodworking.com/2015/05/27/the-craft-of-coopering
- Website, 2nd PA, “The Regiment”, 43rd of Foot, Original American Canteens , http://www.243regiment.com/OriginalCanteens.html
Resource Notes
- COTOWIN 2" Wide Thick Heavy Cotton Webbing,6 Yards (Natural White, Amazon – ($12.59)
- Tapered Cork (Stopper) – 1 inch – 4 pieces - Hobby Lobby – ($2.95)
- ParaffinWax - Hobby Lobby, Cheapest I could find and available in various amounts. Used in Candle Making. They have both, bags of pellets and molded blocks.
- Upholstery Tacks, 100 Pack, Furniture Tacks, Decorative Nail Heads – I used the Bronze colored. Amazon has a wide variety ($5.85)
- Genuine Leather Strap Leather Strip 1/2 Inch Wide and 72 Inches Long, Dark Brown – Amazon ($11.95)
- Lacing Leather Topgrain Latigo Medium Saddle Brown 12 Feet 2 Pieces – Amazon ($8.95)
- Godwin advertises their canteen has iron bands for strength and is pine pitched inside and to not only to keep it watertight, but give it a nice finish as well. It comes with a 1" web strap, not shown. To keep the canteen watertight, we recommend keeping it full of water when stored. Put a tablespoon of baking soda in the water to prevent bacterial growth. When you are ready to use the canteen again, simply rinse out with clean water. This canteen is guaranteed to hold water if properly used. Holds one quart.- https://www.gggodwin.com/Iron-Band-Wooden-Canteen--1-Quart-528_p_462.html
- Townsends has a version shown in Figure #1 as an example for this article and advertises a bit more information that may be considered - Based on original canteens of the period. Good for late Revolutionary War to War of 1812. Comes with tethered hardwood stopper and cotton webbing strap. Lined with brewer'spitch for water tightness. This canteen is 7" in diameter and holds about 1 quart. Made of pine. https://www.townsends.us/products/metal-banded-wooden-canteen-wc769-p-369
Subscribe to:
Posts (Atom)