During the
Revolutionary War the canteens carried by British soldiers were made of tin,
lightweight and watertight. These tin containers weren’t a type of canteen—they
WERE canteens. In other words, at the beginning of the war canteens were by
definition made of tin.
The Americans,
however, were forced to improvise. Having no source of tin, tin canteens were
not an option. Iron was available but was too heavy. So, the “canteens” carried
by most Patriot soldiers were wooden containers (usually made of cedar and oak)
that before the war had been called “wooden bottles.” By 1777 these “wooden
bottles” were standard issue in the Continental army and state militias and had
come to be also called “canteens.”

The photo is of the
wooden canteen of Connecticut militiaman Asa Plank, a veteran of the Battle of
Saratoga.
The following Reasearch was conducted and presented to Popular Woodworker magazine in 2022, who published a two part article.
It is also available for download in PDF at: https://www.instructables.com/Wooden-Staved-Canteen/
Figure 1-
Wooden Canteen - Jas. Townsends which is popular among reenactors
|
I initially started my search of how to make a wooden soldier’s
canteen of the revolutionary war period, as most folks do now days, with a
Google search. You will get everything
that you probably don’t want and little on the subject except for the sutlers
who advertise and sell “Colonial or Reenactment Clothing”. A Wooden 18th Century styled
canteen range from kits costing about $35.00 to finished wooden canteens
costing $110.00. After that, you venture
into antiquities and out of period (not Revolutionary War) gear. These retail canteens and kits are mostly
pine lumber, where actually antiquities show oak wood. This also means that wooden canteens were
“coopered” in the same manner as a large barrel, using the metal hoops/rings to
press the staves firmly against one another to prevent leaking. At the beginning of the 18th
Century, and for some years after, the soldier's canteen was a wooden,
drum-shaped affair, provided with a spout.
Google has some nice pictures but a set of plans or
instruction for building a canteen is not to be found, in the direct sense
anyway. My internet searching identified
a drawing of a “Lewis and Clark (L&C)” canteen (Figure #3). The diagram provides the rough dimensions and
accoutrements of a barrel shaped wooden canteen. I will continue to call it the “L&C
diagram” but have seen other places where it’s referred to as the uniform and
kit of the 42nd Highland Regiment, an Australian Napoleonic reenactment society (among others). The actual author or artist is not known, but
the drawings are very informative.
The basic and most popular barrel in demand was an
airtight, fifty two gallon (200 liter) barrel made of thirty-one to
thirty-three staves with a lid at each end. The preferred wood was oak, for
its density, strength, and qualities it released in the aging of spirits.
Certain types of barrels were also made with pine, especially yellow pine.
The lids or ends were often made of white oak. The staves were held
together by wooden hoops (especially the smaller pails and buckets) made of
hickory.
Most of us do not have the equipment or skills to forge iron/metal
hoops to build our 18th Century vessel, so in keeping with the
canteens and kits mentioned above, the Figure #3 information, you have enough
information to make your simplified version of a reproduction. Now with the size and shape imaged in a
sketch, The angular measurements for the side pieces, or the staves is the next
thing to determine. I do not have one of
the kits to compare the dimensions and have only seen pictures as shown above.
Staved or segmented construction figures in a lot of
projects, from ornamental bowl turnings, to musical drums, porch pillars and
whiskey barrels. Coopering is an art for
in itself, barrel making or cooper is a skilled trade that dates back over
4,000 years. Herodotus (b. 485 BC) described palm wooden casks in shipping
Armenian wine to Babylon. Around 350 BC, Celts were using watertight barrels
that bulged at the middle to withstand stress and could be rolled as well as
stacked. The wooden canteen can only be
surmised to be a manufacturing technique similar to its big barrel brother.
Coppers were skilled technicians, fashioning barrels from
raw wood through many processes. They
were in great demand in Colonial America.
I can imagine that smaller containers such as canteens and buckets could
have been an apprentice skill builder or the smaller cut-off pieces from barrel
making were used in smaller containers.
Now back to building our reproduction wooden canteen.
Staves and Segments
As discussed, a wooden 18th
century canteen is more or less a shortened wood barrel with the sides made
from staves. Less the coopering tools
and techniques, we will pursue a suitable reproduction that you can build in
your home workshop. The questions we now
ask ourselves is;
·
What miter angle (or bevel) do I need for the
side staves?
·
How long (or wide) should I make the stave pieces?
Figure 2-
1874 Model of US Army Canteen, From History of the Military Canteen (Nov-
1900)
|
Finding those answers is relatively easy, and there is an interesting
how to article in wood magazine, that demonstrates the mathematical formulas
for calculating the angles/miters. Since
we know we are making a canteen for our Uniform Kit, I have provided the
measurements for a large and small version of the reproduction canteen.
First, let's get our terminology
straight. Staved cylinders (what we are trying for) and segmented rings may
seem alike to woodworkers, but they're two different approaches in making
rounded structured wood objects. In
general, the grain in rings constructed from segments runs horizontally and the
individual pieces are glued end to end. On
the other hand, the grain in staves runs vertically, and glue the individual
pieces edge to edge. In our case,
“Bevel-to-bevel”. For our canteen
project, we will be using staves where the grain runs over the long direction
of the stave/piece.
So, things can become confusing
when we start talking about the distance between the angles. On a stave that
distance is the width, but on a segment, it's the length. For our canteen
project, we'll refer always to length.
As shown in the L&C diagram [Figure #3} we know the canteen stave is
4 inches long. So, for bigger canteen is
to make a wider stave, in other words make a larger diameter ring. I made my first prototype of a larger canteen
as later shown in diagrams and tables.
However, for your “Uniform Kit” I would recommend the smaller
version.
Figure 3 - The L&C Diagram of Canteen Construction
So, what is the Angle for the Staves?
|
Corner and Miter Angles for various
numbers of sides
|
|
No of
Sides
|
Corner
|
Miter
|
|
6
|
60
|
30
|
|
8
|
45
|
22
1/2
|
|
10
|
36
|
18
|
|
12
|
30
|
15
|
|
16
|
22
1/2
|
11 1/4
|
A full circle contains 360 degrees.
So, to make our canteen from a number of straight pieces, all of the angles of
the corners should add up to 360 degrees. In the table (Figure #3) six
equal-length sides, the six 60-degree corners add up to 360 degrees.
But, 60 degrees is not the angle
you need to cut on the ends of each piece. Because two sides come together to
make the angle, each side must be miter-cut to exactly half the total corner
angle, or 30 degrees. So, half of 60 is
30.
Here's the rule for finding the
angle: To determine the corner angle for a figure with any number of
equal-length sides, divide 360 degrees by the number of sides. To find the
miter angle, divide the corner angle by two.
To achieve a round canteen with
minimal cutting, the more staves in the circle the more round the appearance,
and less finishing will be needed, to get a round canteen. A canteen with 6 or 8 sides could be made,
but the round hoop work for coopering (a real canteen) would not work
effectively. 10 seems like a good
number, but I have been doing 12 staves, as it appears more rounded. 16 is a bit awkward for the smaller canteens
since the pieces would be so narrow. So,
now we have an understanding of the dimensions of the staves we will work with
12 sides/staves. The examples for the
large and small canteens are both designed with 12 staves
So, how big will it be?
I found an article in Wood Magazine
about working with staves and segments.
The article details the mathematics of calculating of how big it will
be? Great, if you are designing a porch
post or even a canteen. But I have done
all of that for you. No math calculating
needed. My prototype canteen was about
8.5 inches in diameter. It turned out
pretty big, and by mathematics, it holds about ¾ of a gallon. Enough for a long march, but I think every day
use a smaller 1 quart would probably suffice for SAR uniform kit. With this in mind I am providing a table for
the dimensions for both the larger 3.25-quart sized canteen and the smaller 1.8-quart
canteen in the following tables.
Figure 4 - Completed
Small and Larger Wooden Canteens
Canteen Dimensions and Cylinder Staves

een
|
Decimal Inches
|
Fraction Inches
|
Centimeters
|
|
Rough Diameter
|
6.5000"
|
6 1/2"
|
16.51cm
|
|
Finished Diameter
|
6.3750"
|
6 3/8"
|
16.19cm
|
|
Number of Staves
|
12
|
|
Joint Angle
|
30.00°
|
|
Bevel Angle
|
15.00°
|
|
Stave Outer Width
|
1.742"
|
1 3/4"
|
4.42cm
|
|
Stave Inner Width
|
1.474"
|
1 15/32"
|
3.74cm
|
|
Stave Thickness
|
0.500"
|
1/2"
|
1.27cm
|
|
Rounded Thickness
|
0.274"
|
9/32"
|
0.70cm
|
|
Board Length Required
|
0.469"
|
15/32"
|
1.19cm
|
|
Staves Length
|
4”
|
|
|
Large 3.25 Quart Canteen
|
Decimal Inches
|
Fraction Inches
|
Centimeters
|
|
Rough Diameter
|
8.5000"
|
8 1/2"
|
21.59cm
|
|
Finished Diameter
|
8.3750"
|
8 3/8"
|
21.27cm
|
|
Number of Staves
|
12
|
|
Joint Angle
|
30.00°
|
|
Bevel Angle
|
15.00°
|
|
Stave Outer Width
|
2.278"
|
2 9/32"
|
5.79cm
|
|
Stave Inner Width
|
2.010"
|
2"
|
5.11cm
|
|
Stave Thickness
|
0.500"
|
1/2"
|
1.27cm
|
|
Rounded Thickness
|
0.238"
|
1/4"
|
0.60cm
|
|
Board Length Required
|
0.469"
|
15/32"
|
1.19cm
|
|
Staves Length
|
4”
|
|
|
Not much changed between the two
examples provided. We know the stave is
4 inches long, on the outside width of the stave changes. Without having to write about mathematics,
the diagrams and information tables were generated using the online tool listed
in Reference 2.
Volume of Example Canteens
The cylinder is a three-dimensional
shape having a circular base. A cylinder can be seen as a set of circular disks
that are stacked on one another. Now, think of a scenario where we need to
calculate the amount of water that can be accommodated in a cylindrical box or
a stave barrel canteen.
In other words, we mean to
calculate the capacity or volume of this box. The capacity of a cylindrical box
is basically equal to the volume of the cylinder involved. Thus, the volume of
a three-dimensional shape is equal to the amount of space occupied by that
shape. Not wanting to do an algebra
class you can adjust your numbers to calculate the cylinder volume using a
calculator from at: https://www.omnicalculator.com/math/cylinder-volume
After the canteen is completely
assembled it is estimated that the volume will be as follows.
Estimated After
Assembly Inside Dimensions
|
Small
Canteen
|
Large
Canteen
|
|
Height
|
3.50
|
3.50
|
|
Radius
|
3.10
|
4.15
|
|
Inside Diameter
after Build
|
6.20
|
8.30
|
|
Estimated
Volume
|
1.83
Quarts
|
3.25
Quarts
|
Tools Needed
|
Materials
|
|
·
Table Saw
·
Router w/ ¼ rabbiting bit
·
Band Saw or Jig Saw
·
Sander or sanding block
·
Power Drill
·
Drill Bits
·
Step drill bit or small rasp
·
General hand tools
|
·
½ thick lumber – 48 inches long (4 inches x 12
pieces)
·
¼ inch thick plywood – 10 inches x 20 inches
·
1 each, 2-inch-wide cotton/linen carrying
strap
·
1 each, 2 Inch strap buckle (optional f/
carrying strap) -
·
2 each, 3-1/2 inches long x ½ inch wide
leather pieces or steel strap
·
½ leather banding or steel strap (for the
hoops) -
·
Tacks for strap
·
120 Grit Sand Paper for rouging and shaping
·
220 Grit Sand Paper for finishing
·
Quality wood glue
·
Double sided tape
·
Paraffin Wax or Bees Wax
·
Wood Stain
·
Linseed Oil for final finish
·
Tapered Cork
·
2 Inch Brass Buckle (optional)
|
Building Your Canteen
Cutting Your Staves
Ripping the Primary Miters
Cut your staves from a ½ inch thick
piece of square lumber. If the piece is
long enough you may only have to do this once and create all the staves from
one piece of lumber. Our you may
substitute shorter pieces and repeated the cut.
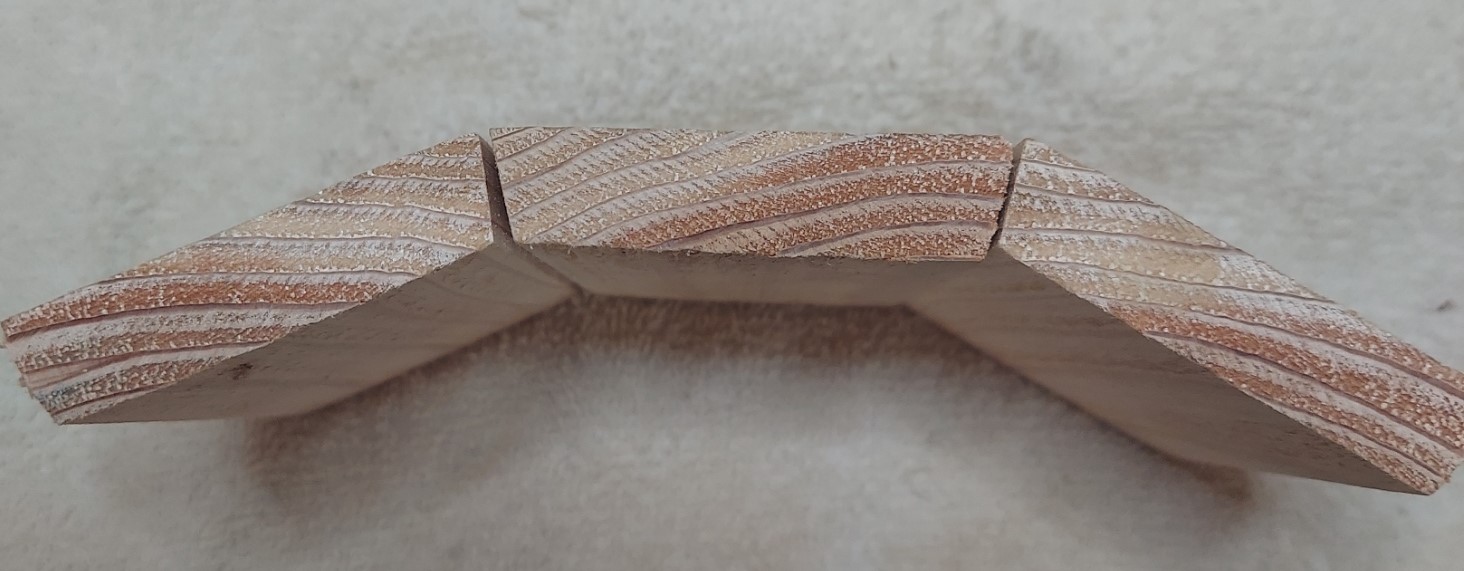
Set your table saw blade to cut at a 15-degree angle, rip down one side,
creating you first bevel. Adjust the
table saw fence to the “Stave Outside Width” of the stave you selected (3.25
quart or 1.8 quart). Flip the board
where the bevel is facing down and is against the fence of the table saw. Rip the second bevel in the long piece of
lumber. Now you should have a long piece
with a 15-degree bevel on each long side in sort of a “V”. The ends of the lumber are still at 90
degrees.
We will now cut the individual (12)
staves. The stave wood grain goes along
the length of the stave.
Warning
- Do Not Crosscut with
The Rip Fence – Instead, use a miter gauge or a crosscut sled.
You have to make your staves with
crosscuts into several pieces of identical length. DO NOT use the rip fence as a
supporting barrier for crosscutting. You
can clamp a stop block to the fence for accurate measurement of length and use
the miter gauge to guide your stock through the blade. This way, you eliminate
the risk of your workpiece getting squeezed between the fence and the blade.
Figure 5-
Stave segments cut at 15 degrees
|
Set your table
saw fence block to be 4 inches from the blade, and use the miter gauge on the
table saw to hold the lumber perpendicular to the blade. Cut a small piece from the end of the lumber
piece to balance the cut, and rid it of any roughness or splits. Check for squareness of this end cut. Then make the 12 staves with a crosscut.
Cutting the Top and Bottom Stave Channels
Figure 6-
Stave channels being fitted to the Top and Bottom Panels
|
You can make the channel for holding the canteen top/bottom with a
router or your table saw. After you have
to cut each stave to 4 inches in length, then return to the table saw or router
and cut a ¼ inch channel on the “Stave Inner Width” ends (Bottom of the mitered
“V”). The channel is ¼ inch from the end
and is ¼ inch deep. The stave length
must have the grain running on the long edge. You can use several methods to cut the
channel;
1.
You can make several passes of the stave on the
table saw to cut the channels. Set where
you want the cut on the table saw, bet the blade height to ¼ inch, cut a pass
on each piece on each end. Make
successive cuts until you get a channel (rabit) ¼ inch wide and a ¼ inch deep.
2.
Use a Table saw with a da-do blade, ¼ inch stack
set to ¼ in height. If you have this,
you probably know how to use it as well.
3.
Use a router – assuming you have one you
probably know how to use it for this project and I won’t detail it here.
Cutting the Top and Bottom Panels`
The top/bottom panels have to be
built but if you can rely on the schematic image the panel may not fit, as this
is the overall diameter, not allowing for the channels to hold the top/bottom
in place. It is best to dry assemble
your canteen with blue painters’ tape, and measure the inside channel across
the to the opposing channel to ensure a tight fit.
Everyone has their way of cutting a
circle using various templates, jigs, compass drawings and so forth. Use a band saw or jig saw to cut the circle as
accurately as you can. Take two pieces of ¼ inch Plywood about 9 x 9 inches
square. Use some double-sided tape to
adhere the two pieces together. This
allows you to cut both top/bottom panels at once. Sand the edges smooth and sand the surfaces
before assembly and finishing.
Test the fit of the round panels
with the dry fit you did earlier with blue painter’s tape.
Building a Spout and Stopper
The Spout
Figure 7 - Step Drill Bits and Tapered Rasp for Rotary
Drill
|
Figure 8-
Spout w/ Stopper
|
I have a wood lathe so I can get creative in making a spout for the
canteen. In L&C Figure #3, the spout
is square and not very detailed. To keep
it simple, a block is angularly cut, and affixed to the top stave of the
canteen with a snug fit and some glue.
The hole is about ¾ inch in diameter.
After the spout is affixed to the stave, a tapered hole can be made with
a step drill, or an angled rasp after the hole is drilled.
The Stopper
Figure 8 - Cork Stopper with Walnut Wood Handle
|
A wine bottle cork could work, but it is not tapered and runs the
risk of falling into the canteen. You do
not have to have a wooden end on you stopper, but it adds some security in
keeping it with the canteen. I made a
fancy walnut knob to attach my stopper to the canteen with a leather lanyard. My knob as a hole drilled through
horizontally, to tie the lanyard. You can use most any shape of wood to your
liking and drill a 3/8-inch hole for affixing a piece of wood dowel rod. Glue the dowel rod into the knob. Drill a 3/8-inch hole into your tapered cork
but do not go all the way through. Leave
about ¼ inch in the base. Measure the
cork hole depth, cut the dowel to the length and glue the cork to the
dowel. You may have to adjust the
canteen spout hole to accommodate the cork depth of fit. I bought a package (4ea) of tapered corks at
Hobby Lobby, and cut about 1/8th inch from the wide end so the
assembly would look better in the spout.
Use a piece of leather lacing to secure the stopper to the spout.
Assembling the Canteen
NOTE: If you plan to
carry water in your canteen, that is its purpose, you may want to do some
waterproofing. Afterall, this is a
reproduction, not a “barrel-pressed” hoop staved container. If waterproofing is wanted, see the section
below.
Use a board to align you staves
against. Roll out blue painters’ tape, and place the outside of the stave onto
the blue tape. When all the staves are
in place, apply glue to the stave mitered joints and to the channels. Place the top and bottom panels near the
center of the row of staves. You can
then roll the painters tape stave “chain” up and around the top/bottom
panels. Secure with tape, bands or
straps until the glue is completely set.
Shaping the Mitered Outside Corners
After assembling the canteen and
all the glue is dried completely, you can begin shaping the 12 sides into a
rounder appearance. If you have a belt
sander or even a powered sander this can be done very quickly on soft woods
such as pine. If you do not have powered
gear, a wood block and fresh sandpaper will also work. You probably will do finer details with a
sanding block as well. Do not forget to
sand the end grain of the staves smooth.
Begin with the 120-grit sand paper and progress to 220-grit, and finer grits
if desired. Judge by eye and touch for
roundness, and sand down the bumps and ridges that are noticed.
Waterproofing your Creation
I have found three similar methods
for waterproofing the inside of the canteen.
Brewer’s Pitch, Bees Wax, and Paraffin.
All three are applied in similar fashion by melting and pouring inside
the canteen. You will have an easier
time applying the hot pitch, wax or paraffin to the inside for waterproofing
after the canteen is assembled and sanded to the round cylindrical shape. It is my theory, that any polyurethan, epoxy,
paint or other coating may not bond entirely, or peel off the wood when in
long/continuous contact with a liquid. Bees wax
could also be used instead but it imparts a bit of flavor to the contents. If you are drinking mead, this may be
desirable. For my canteen, I used melted paraffin
as it is tasteless and the least expensive.
Keep in mind that alcohol
beverages can also damage some wood finishes.
Fortunately, I have an old
Crock-Pot, that I have used on other projects needing melted wax. If you don’t have a Crock-Pot, use a double
boiler to melt the wax evenly. Both
paraffin and bees wax have low melting points and are also flammable and the
double boiler technique will mitigate the risk of a flare up, and melt the wax
evenly. A double boiler can be a normal
household cooking pot with boiling water, and a scrap tin/metal can to hold the
wax. Use a funnel in the canteen spout
of the canteen to pour the melted wax inside.
When applied or poured, the wax will remain liquid a bit, but don’t wait
too long. You are only wanting a coating
on the sides. Insert the stopper, and
roll the canteen about to evenly coat the insides, and pour out the remaining
melted wax, back into the metal can. It
doesn’t take long, as the wax will begin to solidify as soon as it touches the
surfaces inside. I recommend finishing
the outside completely before coating the inside, so if you happen to spill a
bit of paraffin on the outside, your stain/finish will still adhere
properly. In my resource notes near the
end of this paper, I have listed two manufacturers who use different methods to
waterproof their versions of a staved barrel canteen.
Sanitation and Hygiene as Applied to Canteens
The use of polluted water is a
factor dangerous to health and accounts for the prevalence of disease in
localities where other sanitary conditions are beyond reproach. It is the part of wisdom to remove the danger
of possible contamination by the use of a canteen which can be completely
emptied, drained and even sterilized.
There can may be enough places for
germs and micro-organisms to make the use of the canteen. Recommend sanitary conditions be observed to
sterilize your canteen in a way as not to damage the wood or melt the inner
paraffin coating with excessive heat.
Do not store the canteen with water
inside. Empty and air dry when not in
use.
Applying the Outside Wood Finish
There are a wide variety of ways to
finish the outside of your canteen.
Depending upon how well the plywood top/bottom pieces match the wood
staves, this could be a design enhancement or detractor. If you use soft pine wood for the staves, the
color variation of the staves compared to the top/bottom panels could detract
from your design. Linseed Oil is used on
tool handles such as axes, adze, shovels ect. For a reason. It allows inspection of the wood for
splitting, where such defects my not be detectable under a coat of paint. Linseed Oil is inexpensive and makes a
long-lasting finish. It imparts a soft
yellow hue to the wood, and can be applied with a folded cloth. If you want a darker color to help in color
matching the wood, you should stain the wood first, prior to applying the
Linseed Oil or your chosen final finish.
Attaching Hoop and Strap Guides Ornamentation
We know we are not blacksmithing hoops for our vessel, and a
reproduction quality or solution is needed.
As shown in Figure #1, the “hoops” could be fashioned from ½-inch steel
strapping often used for shipping heavy crates. Measured and cut to length it would make an
attractive replacement for hoops. Steel strapping
is available at Amazon and other retailers, but short lengths are quite expensive. Most retailers and transporters use
plastic/nylon strapping. The steel
strapping is hard to find by dumpster diving and most stores who handle pallets
get plastic strap material.
Nevertheless, you may find a business or friend who has access to
some.
Period canteens were also “hooped”
with wood bark strips and leather reinforcement. Or, you may find a suitable banding material
that could be attached to your canteen, that could be painted to appear as
metal or perhaps covered with a metalized tape.
For my canteen I used half-inch leather straps and neatly spaced
upholstery tacks. You have to see what
is available to you and what works for your Uniform Kit.
The strap guides could be of metal
as shown in Figure #1, or leather affixed to each side. The L&C diagrams, Figure #3, shows the blacksmith/forged
guide piece as fitted under the hoops and bent to be held in place. I am sure there are many variations. For our purposes, upholstery tacks can be
used to attach the guides to the canteen.
Just make sure the tack will not split the wood or pierce the canteen
staves creating a leak.
Attaching Carrying Strap
Figure 10 - Methods of Carrying a Military Canteen -
from The History of the Military Canteen
|
I bought 2-inch-wide Thick Heavy Cotton Webbing at Amazon (See
Resource Notes). You could easily make a strap from white cloth of the same
width, or leather. Mimic the strap you
use on your haversack and it will create are more balance look for your
uniform.
I also found a 2-inch-wide brass
slide buckle at Hobby Lobby that is affixed to the strap as an adjuster. My wife helped sew on the buckle and stitched
the ends from fraying. The strap is
placed under the round bottom edge of the canteen, with the strap threaded
through the guides on each side. If
using a strap without a buckle or adjuster, you can secure the ends of the
strap under the guides (left or right) with short tacks.
Summary
Most of you probably are familiar
with woodworking and only needed the diagram tables for making your own canteen
for your Uniform Kit. This may also
provide you guidance and ideas for dressing up or building you Canteen Kit, if
you want to buy one. IF you are making
only one canteen, the prices for the materials may exceed the price of a
“canteen kit” from one of the reenactment suppliers. Nevertheless, I have enjoyed my research, and
learned a bit. But I enjoy working on
crafts in wood and plan to provide other period items in the future.
The finished canteens….ta-da!
References
History of the Military Canteen, Lieut. -Col.
Phillip Reade, Inspector General U. S. V., (Major 4th U. S. Infantry) Published
by authority of The Honorable, The Secretary of War, 1900. https://archive.org/details/historyofmilitar01read
- Fine Woodworking Magazine, The Craft of
Coopering, Staves and a hoop make a watertight vessel, By Jonathan Binzen #248–July/Aug
2015 Issue, https://www.finewoodworking.com/2015/05/27/the-craft-of-coopering
- Website, 2nd
PA, “The Regiment”, 43rd of Foot, Original American Canteens , http://www.243regiment.com/OriginalCanteens.html
Resource Notes
- COTOWIN 2" Wide
Thick Heavy Cotton Webbing,6
Yards (Natural White, Amazon – ($12.59)
-
Tapered Cork (Stopper) – 1 inch – 4 pieces - Hobby
Lobby – ($2.95)
-
ParaffinWax - Hobby Lobby, Cheapest I could find and available in various amounts. Used in Candle Making. They have both, bags of pellets and molded
blocks.
-
Upholstery Tacks, 100 Pack, Furniture Tacks,
Decorative Nail Heads – I used the Bronze colored. Amazon has a wide variety ($5.85)
-
Genuine Leather Strap Leather Strip 1/2 Inch
Wide and 72 Inches Long, Dark Brown – Amazon ($11.95)
- Lacing Leather Topgrain Latigo Medium Saddle
Brown 12 Feet 2 Pieces – Amazon ($8.95)
- Godwin advertises their canteen has iron bands
for strength and is pine pitched inside and to not only to keep it
watertight, but give it a nice finish as well. It comes with a 1" web
strap, not shown. To keep the canteen watertight, we recommend keeping it
full of water when stored. Put a tablespoon of baking soda in the water to
prevent bacterial growth. When you are ready to use the canteen again, simply
rinse out with clean water. This canteen is guaranteed to hold water if
properly used. Holds one quart.- https://www.gggodwin.com/Iron-Band-Wooden-Canteen--1-Quart-528_p_462.html
-
Townsends has a version shown in Figure #1 as an
example for this article and advertises a bit more information that may be
considered - Based on original canteens of the period. Good for late
Revolutionary War to War of 1812. Comes with tethered hardwood stopper
and cotton webbing strap. Lined with brewer'spitch for water tightness. This canteen is 7" in diameter and
holds about 1 quart. Made of pine. https://www.townsends.us/products/metal-banded-wooden-canteen-wc769-p-369