
Saturday, June 8, 2024

Thursday, June 6, 2024
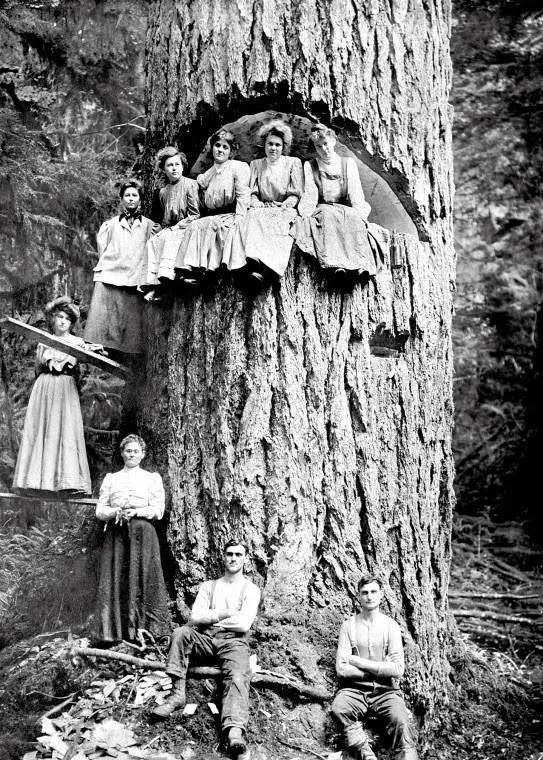
Echoes of the Past: The Fall of the American Chestnut in Appalachia
The American chestnut tree (Castanea dentata) was once a dominant species in the Appalachian forests, making up an estimated 25% of the hardwood canopy. These majestic trees, which could grow over 100 feet tall and live for centuries, were a cornerstone of the ecosystem and a vital resource for both wildlife and human communities. However, the arrival of the chestnut blight in the early 20th century led to one of the most devastating ecological disasters in American history.
Thursday, May 30, 2024
NATIONAL HOLE IN MY BUCKET DAY
On May 30th of each year, National Hole in My Bucket Day is observed. This wacky holiday is in honor of the fun children's song; There's a Hole in My Bucket.
From <https://www.nationaldaycalendar.com/national-day/national-hole-in-my-bucket-day-may-30>
NATIONAL HOLE IN MY BUCKET DAY
On May 30th of each year, National Hole in My Bucket Day is observed. This wacky holiday is in honor of the fun children's song; There's a Hole in My Bucket.
The song which has its origins in 1700 Germany, is about a back and forth conversation between Henry and Liza. Henry needs to fix his leaky bucket. In each stanza, Henry asks Liza for advice. In the end, he needs a bucket to carry water to repair his bucket.
While this annual event was inspired by a song concerned with fixing a leaky bucket, there are other ways to celebrate this day. We all know it's a bit of a bummer when a once serviceable bucket gets a hole. But not all is lost. Holey buckets still serve a purpose. While they may no longer hold liquids (or hold them well), they do still maintain volumes of mass. Depending on where the hole is, it can do many jobs.
- Buckets of many sizes make excellent planters, especially for garden vegetables that sow deep roots.
- Fill it with concrete to hold a PVC pipe. Then you'll have a sturdy umbrella stand.
- Make a garden seat for weeding the flower beds, and you'll have storage for your tools, too. It doesn't take a lot of skill to make a padded covered seat out of the lid.
- Create a compost bin. Even with a hole in it, you'll be able to make terrific, nutrient-rich compost for your garden.
- Old galvanized buckets make excellent décor on the patio or in your home. Use them as light shades or side tables.
- Build a birdhouse, bird feeder, bird or butterfly bath.
- Storage, storage, storage. Buckets of all kinds can be dressed up and used to store tools, outdoor toys, and gear.
So sing the song while you repurpose your leaky bucket.
HOW TO OBSERVE HOLE IN MY BUCKET DAY
How many ways can you reuse a leaky bucket?
1. Show us how by using #HoleInMyBucketDay to post on social media.
2. Perhaps sing the song

There's a hole in my bucket, dear Liza, dear Liza,
There's a hole in my bucket, dear Liza, a hole.
Then mend it, dear Henry, dear Henry, dear Henry,
Then mend it, dear Henry, dear Henry, mend it.
With what shall I mend it, dear Liza, dear Liza?
With what shall I mend it, dear Liza, with what?
With straw, dear Henry, dear Henry, dear Henry,
With straw, dear Henry, dear Henry, with straw.
The straw is too long, dear Liza, dear Liza,
The straw is too long, dear Liza, too long.
Then cut it, dear Henry, dear Henry, dear Henry,
Then cut it, dear Henry, dear Henry, cut it.
With what shall I cut it, dear Liza, dear Liza?
With what shall I cut it, dear Liza, with what?
With a knife, dear Henry, dear Henry, dear Henry,
With a knife, dear Henry, dear Henry, a knife.
The knife is too dull, dear Liza, dear Liza,
The knife is too dull, dear Liza, too dull.
Then sharpen it, dear Henry, dear Henry, dear Henry,
Then sharpen it, dear Henry, dear Henry, sharpen it.
With what shall I sharpen it, dear Liza, dear Liza?
With what shall I sharpen it, dear Liza, with what?
With a stone, dear Henry, dear Henry, dear Henry,
With a stone, dear Henry, dear Henry, a stone.
The stone is too dry, dear Liza, dear Liza,
The stone is too dry, dear Liza, too dry.
Then wet it, dear Henry, dear Henry, dear Henry,
Then wet it, dear Henry, dear Henry, wet it.
With what shall I wet it, dear Liza, dear Liza?
With what shall I wet it, dear Liza, with what?
With water, dear Henry, dear Henry, dear Henry,
With water, dear Henry, dear Henry, with water.
In what shall I fetch it, dear Liza, dear Liza?
In what shall I fetch it, dear Liza, in what?
In a bucket, dear Henry, dear Henry, dear Henry,
In a bucket, dear Henry, dear Henry, in a bucket.
But there's a hole in my bucket, dear Liza, dear Liza,
There's a hole in my bucket, dear Liza, a hole.
Saturday, April 13, 2024
Transferring Patterns to Wood
For pattern-transferring advice, we consulted professional decorative painter Jackie Shaw, whose methods you'll find easy to master. Use them and your painted pieces will win compliments as never before.

Patterns are key to painting success. Whether you're transferring the main outline of a design or adding intricate details, the pattern guides you to picture-perfect results. In her book, The Big Book of Decorative Painting (Watson-Guptill Publications, 1994), author Jackie Shaw includes a chapter with tips and techniques for copying patterns and transferring designs to base-coated projects.
We'll give you four foolproof methods for transferring patterns -- along with a few tips from Jackie. But first, before you transfer a pattern, copy the outlines of the design on tracing paper. Jackie encourages painters to take the liberty of re-creating the pattern while they copy it. "Move the tracing paper around the pattern so you can rearrange, add, or subtract elements as you go along," Jackie says. Next, using one of the four methods following below, transfer the design onto the base-coated wood. These techniques require simple tools like chalk, a No. 2 pencil, tracing paper, and commercial transfer paper.
Method 1
Retrace the pattern lines or rub the back of the pattern with chalk. Turn the traced pattern face down, and retrace the lines with a chalk pencil or rub the back with chalk. Then position the pattern, chalk side down, on the base-coated surface. Using a stylus, retrace the lines. Apply very little pressure, or you'll make grooves on the wood surface. "Chalk is my personal choice for transferring patterns because it's easy to remove, and it allows for creativity and alterations without ever leaving behind a 'ghost' of the pattern," Jackie says.
Retrace the pattern lines or rub the back of the pattern with chalk. Turn the traced pattern face down, and retrace the lines with a chalk pencil or rub the back with chalk. Then position the pattern, chalk side down, on the base-coated surface. Using a stylus, retrace the lines. Apply very little pressure, or you'll make grooves on the wood surface. "Chalk is my personal choice for transferring patterns because it's easy to remove, and it allows for creativity and alterations without ever leaving behind a 'ghost' of the pattern," Jackie says.
Method 2
Rub the back of the pattern with a No. 2 pencil. With the traced pattern face down, hold the pencil horizontally on the paper while applying the graphite. Lightly wipe off the excess graphite dust. Then place the pattern, treated side down, on the base-coated surface and retrace the lines with a stylus.
Method 3
Apply the pattern with commercial transfer paper. Check at local crafts stores or art-supply stores for special artist's transfer paper -- several brands are available. Slide the sheet of transfer paper, treated side down, between the pattern and the base-coated surface, and trace over the lines as directed above. Although it might be tempting to substitute carbon paper for the transfer paper, "it's best not to use it because over time it will bleed through paint," Jackie says.
Apply the pattern with commercial transfer paper. Check at local crafts stores or art-supply stores for special artist's transfer paper -- several brands are available. Slide the sheet of transfer paper, treated side down, between the pattern and the base-coated surface, and trace over the lines as directed above. Although it might be tempting to substitute carbon paper for the transfer paper, "it's best not to use it because over time it will bleed through paint," Jackie says.
Method 4
Make your own transfer paper. You'll need tracing paper and several pieces of chalk, both white and colored. To make light sheets of transfer paper (to use on medium- and dark-colored surfaces), rub one www.MyShedPlans.com side of each piece of tracing paper completely with a piece of cheap white chalk. (Do not use artist's pastel chalk because its wax base can mar your painting.) Rub the chalk into the paper with your fingers. Then shake off any excess chalk. For dark sheets of transfer paper, use colored chalk or a pencil. Shake off any excess chalk or graphite. Store the sheets by folding the treated sides together.
Make your own transfer paper. You'll need tracing paper and several pieces of chalk, both white and colored. To make light sheets of transfer paper (to use on medium- and dark-colored surfaces), rub one www.MyShedPlans.com side of each piece of tracing paper completely with a piece of cheap white chalk. (Do not use artist's pastel chalk because its wax base can mar your painting.) Rub the chalk into the paper with your fingers. Then shake off any excess chalk. For dark sheets of transfer paper, use colored chalk or a pencil. Shake off any excess chalk or graphite. Store the sheets by folding the treated sides together.
Transferring Tips
- When transferring a pattern, place a sheet of waxed paper on top of it to help you keep track of lines already traced. The stylus will etch the wax paper as you work, showing clearly where you've traced.
- To remove chalk or transfer-paper pattern lines after painting, rub off marks with a soft cloth dampened with clean water. Graphite or other commercial transfer papers may require mineral spirits.
- Transfer as little of the design as possible to the wood. This will allow you to be more creative with painting.
Sunday, March 24, 2024
Pilot Hole Sizes For Wood Screws

|
Pilot Hole Sizes For Wood Screws |
|||
|
Screw |
Shank |
Pilot |
Pilot |
|
0 |
1/16 |
1/64 |
1/32 |
|
1 |
5/64 |
1/32 |
1/32 |
|
2 |
3/32 |
1/32 |
3/64 |
|
3 |
7/64 |
3/64 |
1/16 |
|
4 |
7/64 |
3/64 |
1/16 |
|
5 |
1/8 |
1/16 |
5/64 |
|
6 |
9/64 |
1/16 |
5/64 |
|
7 |
5/32 |
1/16 |
3/32 |
|
8 |
11/64 |
5/64 |
3/32 |
|
9 |
3/16 |
5/64 |
7/64 |
|
10 |
3/16 |
3/32 |
7/64 |
|
11 |
13/64 |
3/32 |
1/8 |
|
12 |
7/32 |
7/64 |
1/8 |
|
14 |
1/4 |
7/64 |
9/64 |
|
16 |
17/64 |
9/64 |
5/32 |
|
18 |
19/64 |
9/64 |
3/16 |
|
20 |
21/64 |
11/64 |
13/64 |


Friday, March 15, 2024
Crafting a Turning Saw (Bow Saw)
Fabricating the Frame

A turning saw, often likened to a miniature bow saw, shares similarities with a coping saw but boasts a larger frame typically around 12 inches in size. Tools for Working Wood offers a turning saw of exceptional quality for approximately $180, slightly beyond my intended budget. However, they generously furnish both the components and comprehensive blueprints for constructing one's own saw, a project well-suited for most woodworking enthusiasts. Accompanying the parts and plans is a detailed set of construction notes, facilitating the process significantly.
To commence the project, I procured a set of pins and three blades from TFWW, intending to fashion my own handles owing to the presence of a lathe in my workshop. The plans, when printed on legal-size paper with scaling disabled, yield accurately dimensioned templates. These templates, including those for the cheeks and stretcher, necessitate adherence to straight-grained stock due to the substantial stress these components endure. Once the templates are affixed to the chosen stock using an Elmer's glue stick, they serve as guides for cutting. Any residual adhesive can be easily eliminated with a wipe of mineral spirits, especially since sanding the wood is a subsequent step in the finishing process.
Minor deviations in the cutouts, as encountered in my own work, need not cause undue concern given the forgiving nature of the design. While alignment of the pinholes is desirable, the overall precision required is minimal, given the primary function of the saw—to provide blade tension and support during cutting operations. Any discrepancies can be remedied through carving or sanding adjustments during subsequent stages of assembly.
In the next phase,
these roughed-out components will be transformed into finished parts, including
the creation of knobs and a winding toggle.
- Free Plans: https://toolsforworkingwood.com/extra/images/bowsaw/Gramercy_bows_full_8x14.pdf
- Notes: https://toolsforworkingwood.com/store/more/bowsawplans.html
- Parts: https://toolsforworkingwood.com/store/item/GT-BOWS.XX
Assembling the Turning Saw: Completing the Construction
Following the shaping of the frame components, attention turned to the fabrication of the handles and the winding toggle, depicted in the accompanying image. Regrettably, photographing the process while utilizing power tools, including the lathe, proved cumbersome, necessitating a descriptive narrative in lieu of visual documentation.
The toggle begins as a ½” diameter cylinder, easily fashioned from offcuts derived from the saw material. After rounding the ends and forming a cove near one extremity to accommodate the tensioning strings and allow for pivoting under tension, the toggle is completed by flattening the opposite end into a paddle shape. Multiple methods exist for achieving this, but I opted for expediency, utilizing a stationary belt sander for a swift process lasting a mere 60 seconds.
Similarly, the handles, fashioned from walnut for their durability, were swiftly fashioned on the lathe. A ¼” hole bored into one end accommodates the blade pin, while the handle's simplistic form lends itself to a straightforward turning exercise, with precision being of secondary importance. After the completion of both handles, the blade pins are securely affixed in place using a slow-setting epoxy, ensuring a robust bond. Any excess epoxy is carefully managed, as the pins are pressed into position, exploiting the grooved design to facilitate adhesion.

For the finishing
touch, a diluted boiled linseed oil is applied in two coats, providing both
protection and aesthetic enhancement. With the components prepared, final
assembly entails inserting the stretcher into the mortises and affixing the
blade to the pins, akin to a coping saw. Following the recommended stringing
method—utilizing 20lb (or stronger) braided fishing line—the toggle is employed to tension
the blade, with personal discretion guiding the extent of tension applied. The string/line is also available on the parts link above, but I had a fishing rod that used the braided line.
Acknowledging the subjective nature of tension requirements, experimentation and familiarity with the saw's nuances are recommended. As I acquaint myself with its operation, I intend to refine my understanding of optimal tension levels and share insights gained from practical experience. In conclusion, embarking on this endeavor proves to be both enjoyable and rewarding, offering a cost-effective solution to one's sawing needs.
Subscribe to:
Posts (Atom)